Showing posts with label hobbies. Show all posts

Monday, September 5, 2011

Make Yourself a Dress, Part 4

Once I had all my fabric carefully marked, I was ready to begin actually sewing my dress. Which brings us to…

Make Yourself a Dress, Part 4: The Bodice

This section really ought to be titled "Do Whatever Your Pattern Says To". The entire remainder of the process could fall under that banner, actually. So we'll now diverge a bit from this series masquerading as a true how-to, and instead I'll just share what steps I've been muddling my way through.

1. Baste. Basting is the process of loosely hand-stitching the pieces together as marked (including darts), sort of a dry run, so you can try the bodice on for fit. If the fit's off or you make a mistake, you can simply pull out the stitches as opposed to having to laboriously seam-rip a machine-stitched hem. [Romance authors, insert bodice-ripping joke here.]

2. Actual sewing! Once you're satisfied that the garment fits, follow the pattern's instructions and begin sewing the bodice together for real, including darts. Pay close attention to where any closures will need to go. I recommend ironing the seams once you're done, to "set" them. Before finishing any seams (folding them in and stitching them together to prevent fraying) try on the garment again to confirm the fit's still looking good. Now is also the time to decide if you might not just prefer to keep the dress as it is—in my case, as a fashionable owl-patterned belly shirt.

You too can be the proud owner of an owl-patterned belly shirt!

3. Facing. The next step for my dress was to attach the sleeve and neckline facing. Facing is a piece of fabric that lines the openings, giving them a tidy, more tailored look (as opposed to just turning down the edges). I thought this was overly fussy and complicated at first, but I changed my tune when I saw how nice the sleeves and neck ended up looking.

4. Finishing. Finishing your seams can be done a few ways. I went with a method where you fold any raw, joined edges in one each other, and sew them together (then press them with the iron). For the facing, I added another step, using bonding tape. Bonding tape is basically heat-activated glue, which comes off its spool resembling a spent dryer sheet (you can see my spools in the photo below). You lay a strip of it between the fabrics, then press with a hot iron to bond them. My facings were a bit gnarly, sticking out at awkward angles no matter how much I pressed them, so I found this step very helpful. Two notes about bonding tape, though—stick with a very thin/fine variety (you'll still be able to separate the fabric if you screw up) and TEST IT FIRST on scraps of the fabric you're using, to make sure it doesn't darken or discolor the material.

Here you can see the inside of the back collar, where I've finished and bonded the collar facing.

And now your bodice will be nearly done, with the possible exception of a zipper or other closures. In the next step, I'll be talking about assembling the skirt.

Saturday, September 3, 2011

Make Yourself a Dress, Part 3

In the last post in this series, I talked about trimming the pattern, pinning it to the fabric, and cutting the fabric. Now it's time to mark the fabric. Marking the fabric precisely as the pattern directs is the difference between a garment that fits, and one that looks like a hot mess. Mine may still wind up a hot mess, but not for lack of trying. So, onward!

Make Yourself a Dress, Part 3: Mark that Biotch

As I said before, I chose to go about this the old school way, so I can't share any wisdom on the process of using tracing carbon and a tracing wheel to mark the fabric. Instead, I used a combination of tailor's tacks and a pen. Both techniques have their headaches and advantages, and next time I suspect I'll give the tracing carbon a shot. So…

1. Tailor's tacks. The purpose of these are to temporarily mark the fabric with the various guides included on your pattern pieces. With a sewing needle and thread, you simply sew loose stitches through the pattern and the fabric, so that once you remove the pattern, your fabric will still show all the pertinent marks, such as where to hem, or join a dart, or sew one piece to the adjacent one. This gets a bit tricky when you're marking a doubled-up pair of pieces, and I recommend you Google "tailor's tacks" and get a more experienced dressmaker's take on the process. I think I know what I'm doing, but to be honest, I'm only about seventy-percent confident. Still, they worked!

You can see the tailor's tacks I've added here—the yellow thread sewn through the pattern and
the fabric beneath, marking important guide spots without damaging the fabric.
And once you unpin and gently remove the pattern, the temporary guide stitches remain.
2. Just use a damn pen. There were a couple of pattern pieces with which, I will admit, I totally lost patience with and couldn't bear to use tailor's tacks for every little guide. So instead, because my fabric is dark and also colorful, I just used a red roller-ball pen, marking the guide with tiny red dots. Saved me ton of time, so no regrets. But full disclosure.

In the next step, things finally start getting exciting, and I'll talk about the stage I'm currently in, sewing the bodice and finishing its seams.

Saturday, August 27, 2011

Make Yourself a Dress, Part 2

Once I had all of my materials gathered, it was time to get to work preparing the pattern and fabric. Which leads us to…

Make Yourself a Dress, Part 2: Prep That Sucker

I skipped the steps you'd follow if you wanted to preserve your pattern by tracing a copy of the original. I also skipped the steps you'd take if you employed tracing carbon paper, using it and a tracing wheel to imprint the pattern onto your fabric. Instead, I went with the following steps:

1. Study your pattern. Open the package and carefully remove the pieces of your pattern and the instructions. If you're like me, a pattern-sewing virgin, study each step and its corresponding piece(s), until you feel pretty confident that you know what they mean. It may require you to look up various terms and techniques online (for example, I had to look up "basting" and "straight grain"). Pay extra-close attention to any instructions telling you which side of the fabric to pin or trace the pattern onto, which pieces must abut a fold, and which pieces you will be cutting two of at once (by doubling up the fabric).

2. Prep and cut your pattern. This is fairly self-explanatory. Your instructions may vary, but generally you simply cut along the solid outer lines of your paper pattern, until all of the pieces are neatly trimmed into the shapes the fabric will ultimately be. My pattern probably hasn't been taken out of its envelope in sixty years, so I found it necessary to spread it under a handkerchief and iron it smooth (no steam, obviously), as its creases were quite tenacious. That plus cutting took me a careful hour.

My dress pattern, fully cut.

3. Pin the pattern to the fabric. Again, this is if you choose to pin your pattern, versus using tracing carbon to transfer the lines. Iron your fabric, if it's wrinkled. If you have the exact amount of fabric needed, according to the pattern's package, lay the pieces out precisely as instructed, to make sure you don't short-change yourself. Not trusting my own patience or experience, I bought an extra yard, so I didn't have to lay things out quite so precisely.

Be sure to do this step in strict accordance with your pattern's instructions, as well as the instructions printed on the individual pieces of the pattern. You'll need to pay close attention to folds, as some pieces of the pattern may be one half of a mirror image, doubled by butting them along the fold of a doubled-up length of fabric (like cutting out a Valentine heart from a folded piece of paper). Read the instructions carefully, as some pieces of the pattern will need to be pinned to the front the fabric, others to the back.

Once you're confident of the placement of the pattern pieces on the uncut fabric, pin the pattern in place using straight pins (I placed one pin about every inch or inch and a half, set a half-inch inside the pattern's edges).

Pin the pattern carefully to the fabric, to make cutting the fabric accurate and easy.

4. Cut the fabric. Cut out the various shapes roughly, so they're separate and easier to handle, as opposed to wrestling with long swathes of pin-covered fabric and delicate pattern paper. Using sharp fabric scissors (actually, I used hair-cutting scissors) cut the fabric right along the border of the pinned patterns. Also cut any "clip" lines, which will be labeled on the pattern.

My big old pile of pinned and cut pattern pieces and fabric, ready to baste!

That's it for the prep stage! Sounds easy, but go slow and read all the instructions twice before you cut anything. All together, cutting the pattern and fabric took me about four hours, including ironing and snack breaks and running up- and downstairs doing the laundry, pre-hurricane.

Back soon with the next stages—marking and basting!

Make Yourself a Dress, Part 1

It's been a few years since I've really sewn, aside from the odd hem. But back in college I probably made a half dozen skirts, a few tote bags, several blankets, two amateur but respectable quilts, and a zillion random little gifty things. But never before have I sewn from a pattern. The urge came because I have (or rather my trampy conjoined erotica-writing twin, Cara, has) a conference coming up in a few weeks, and we're in the market for a new dress.

Front of my 1951 vintage Simplicity dress 
pattern. I'll be making the style on the left.
As a soft-around-the-edges Irish-style lass, I look best in structured, non-clingy silhouettes. Jersey is not my friend, and neither is anything that won't hide bra straps. For my first Harlequin party last summer I stumbled across The Perfect Dress for myself at Macy's, a total retro fifties housewife number, with cap sleeves, a fitted waist, modest neckline, and a knee-length party-type skirt. Sadly, and despite the whole Mad Men craze, I haven't had especially good luck finding many more such dresses, off the rack. But as I was scouring Etsy, ogling vintage remakes but lamenting their prices (which are fair for handmade clothes but still way out of my budget) I thought, "Hey, make your own dress, stupid!" So I added the word "pattern" to my search for "1950s party dress", and so the project began.

Over the next few days, you're welcome to watch my progress. I could easily fail, since as I said, I've never worked from a pattern before. My sewing machine is basic but reliable, and despite living with a fashion major whilst in art college, my limited command of sewing vocabulary requires frequent consultations of the internet for definitions, diagrams, and how-to videos. But I have faith! So, let's get started.

Make Yourself a Dress, Part 1: Get Your Shit Together

This is the crucial, duh step my younger, more now-now-now! self would have fudged, but thankfully I've matured enough (and have been taught about the virtues of patience in abundance by the publishing industry) to realize that before you begin every project, you need to gather your materials.

1. The pattern. Most important by far (well, that and a sewing machine). As I said, I ordered my pattern from Etsy, from a site with quite a selection of vintage patterns. I actually bought two party dress patterns: a 1956 Butterick, and 1951 Simplicity. The one I'll be making this weekend (barring a hurricane-related power failure) is the Simplicity. (If you order vintage or pre-owned, make sure the seller specifies that the pattern is still "uncut".) While browsing, I had the additional step of figuring out what size I would have been, sixty years ago. The Gap thinks I'm a 6 and H&M thinks I'm an 8, but Simplicity says I land right between a 16 and an 18 in early 1950s sizing, going by my bust-, waist-, and hip-measurements. I went with the pattern for the 18, since it's far easier to take a dress in than to add to one.
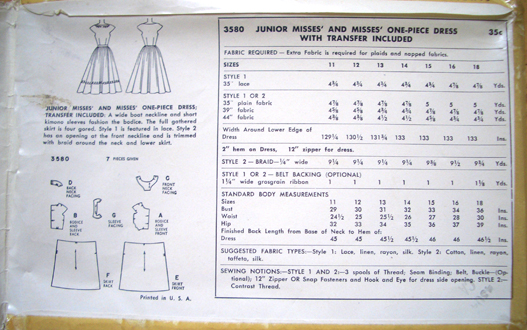
The back of my Simplicity pattern's packaging, with helpful sizing and materials info.

My dorky owl fabric, ordered from the highly
searchable and addictive Fabric.com.
2. Materials. The sizing information is displayed on the back of the pattern's packaging, along with tons of other valuable stuff, such as how much fabric to buy (depending on the size) and of what material, and all the notions you'll need (closures, trim, thread, etc.) I knew I wanted a kitschy pattern, but since I'm an amateur, I took the advice of the masses and chose a non-directional one, meaning unlike stripes or plaid, it won't matter if the pattern doesn't match up perfectly at the seams. Here's my shopping list (specific to my pattern and size, but it'll give you a sense of the checklist):
  • 5 yards cotton, linen, rayon, or other non-stretch fabric (I ordered 5½, to be safe)
  • 2½ yards chiffon, satin, or tulle (amount suggested by the helpful lady at Joann) to fill out the skirt; not included in the pattern, but I wanted this lining for both volume and aesthetic
  • 12-inch invisible zipper, color to match the dress
  • 2 yards wide satin ribbon, for belt / bow at waist, in contrast color to main dress
  • 3 spools thread, color to match the dress
  • seam binding (I actually skipped this, on the advice of the sharp little old lady stationed in Joann's pattern department, who said it's more trouble than it's worth)

3a. Tools. Most of these I already owned, but here's a basic list, all available at a fabric store like Joann:
  • Sewing machine, with various basic accessories
  • Hand-sewing needles
  • Many, many straight pins and a handy cushion in which to stick them
  • Tape measure (best to have this before you settle on a size)
  • Fabric scissors (or just sharp, clean everyday scissors)
  • Water-washable white pencil (for marking dark fabrics)
  • Seam ripper (dear God, do not forget this one)
  • Ironing board and iron

3b. Pattern tracing tools. For tracing your pattern onto your fabric, for accuracy. I'm actually doing this step the old fashioned way, cutting slits in the pattern for marking the fabric (I'm using a dark, chocolate brown fabric, so tracing carbon wouldn't help me much, hence the white pencil). But here's the shopping list, just to be helpful:
  • Pattern tracing paper (this is for if you want to make a copy of pattern, to preserve the original)
  • Tracing carbon (sometimes included with the pattern, also easy to find at Staples)
  • Plastic, non-serrated tracing wheel

4. Other essentials. Some equally important steps and materials:
  • Coffee or similar stimulant
  • A well-lit room with plenty of space to spread things out on the table or the [recently swept] floor
  • Comfy clothes, as you'll likely be kneeling and bending and leaning over a lot
  • A good mood; don't attempt this when feeling impatient or irritable
  • Hours of calming-but-upbeat tunes (I used to sew and knit exclusively to Tori Amos and Nine Inch Nails, but luckily I've since graduated to Martin Sexton, Neko Case, Joni Mitchell, and the Mystery Jets)

All my materials, ready to go!

So that's Part 1. In the next step, I'll tell you how to prepare the pattern and the fabric, before we actually begin the hardcore sewing of the damn dress.

Saturday, February 26, 2011

Bucked from the Hobby Horse

My manfriend brought home his very first guitar this week, and has been spending a lot of time holed up in his office with his shiny new Precious and amp and how-to book, the muted sounds of electric strumming leaking through the door while I read at night or work on my own projects on the weekends. Do I feel neglected? Hell no! I've been nagging him to cultivate a new hobby for a long time, so I'm pumped. Plus his fingers are getting all callused. Growr.

Anyone else recently take up a new pastime? Tell me so that I may be jealous. I'm missing a hobby of my own at the moment.

Oh, my poor neglected tub o' yarn.
For a long time, writing was my hobby. Then when I lost my day job as a designer and had a few months of severance pay and unemployment insurance to help keep Team Awesome afloat, writing became my "jobby"—the thing my manfriend and I decided I should pursue as though it were my full-time paid gig, even though I wasn't yet published. It was clear to the both of us that I was good at it, and it fulfilled me more than working at my old job (which while fairly fun and decent-paying, wasn't feeling especially creative after five years of working on the same types of projects). So I had our collective couple's blessing to pursue writing until the money got unreasonably tight. And who'd have guessed it, six months into the lark, I sold my first book! Followed by another dozen. Though money is indeed way tighter than it was when I earned a salary, I'm still full-steam-ahead on making writing my full-time gig.

So, my hobby-turned-jobby turned into an actual job. Which leaves me hobbiless. I have a bunch of quasi-hobbies—reading, watching reality TV (while drinking wine), playing Angry Birds (also while drinking wine)… But those are passive occupations, requiring little of me aside from my attention, so I don't qualify them as hobbies. Walking and running are more physical upkeep than pastimes to me, cooking is as pleasurable as always but still a household obligation, so I don't count those, either. I find myself with occasional graphic design projects, for myself or others, but they're more diversions, not so much what I think of as a hobby.

A hobby is a long-term activity, in my view, one that requires you to continuously learn and gain competency. Like the study of a foreign language, yoga, painting watercolors, rock-climbing, poetry, amateur filmmaking, martial arts [wistful sigh], quilting, non-essential cooking, sailing, community theater, skateboarding, carving the faces of foreign dignitaries onto walnuts… You see where I'm going with this attempted definition. Something persistently challenging and hopefully creative. Something you look forward to while you toil away at your day job, and occasionally fantasize that you might one day make a living from.

Well my new day job, miracle of miracles, is still as creatively fulfilling as it was before The Call. So by the end of the day or the work week my mind is tapped, hence all my passive "hobbies". Staring at a page or screen is all I've got in me. I used to knit (I can produce a variety of impressive items, all of them roughly rectangle-shaped), practice Taekwondo, study French, sew, and try my hand at a variety of visual arts projects. I've always tended to grow bored easily then seek out new challenges as soon as I felt I'd grown competent with (if not mastered) a given skill. But now my brain's mush after fifty hours of working on projects that, generally speaking, I have massive creative control over.

Hmmm, suddenly this post sounds really douchey. Let me be clear—I'm not complaining! But I do miss having a hobby in my life. I've shifted to having projects instead, since that implies a challenge with a finite lifespan—an end. I very much feel that writing is something I'm still in the midst of getting good at, and I just don't have the energy to cultivate any additional creative skills just now.

What happens when your hobby turns into your profession? Does it become your "calling"? Your "passion"? Your "life"? I don't really know. But I do know that I'm just a little jealous of my manfriend, sequestered this very moment in his room, strumming away, with the promise of years of creative growth and challenge spread before him, should he choose to continue on his musical journey. I guess for now I'll just have to live vicariously. Possibly while drinking wine.