Sunday, August 28, 2011

Six Sentence Sunday #3

Six sentences from Honeymoon for One (working title) just contracted by Harlequin Blaze. The sale came after a very challenging year of rejections, following my initial sale.

The heroine has just run away from her wedding and is en route to her honeymoon destination, sans groom, being transported to a private island by a very irksome seaplane pilot…

“Not too late to swim, if you’re offended by the service.”

“No, thank you, though I suspect I’ll be sitting in the cabin on the way back.”

“Probably wise—my old man was a cabbie in New York,” Will said. “My gifts of customer service are purely genetic.”

“A very rare and malicious disorder, I’m sure. Thank goodness you’re not contagious.”


Head here to check out all the other Six Sentence Sunday excerpts.

Saturday, August 27, 2011

Make Yourself a Dress, Part 2

Once I had all of my materials gathered, it was time to get to work preparing the pattern and fabric. Which leads us to…

Make Yourself a Dress, Part 2: Prep That Sucker

I skipped the steps you'd follow if you wanted to preserve your pattern by tracing a copy of the original. I also skipped the steps you'd take if you employed tracing carbon paper, using it and a tracing wheel to imprint the pattern onto your fabric. Instead, I went with the following steps:

1. Study your pattern. Open the package and carefully remove the pieces of your pattern and the instructions. If you're like me, a pattern-sewing virgin, study each step and its corresponding piece(s), until you feel pretty confident that you know what they mean. It may require you to look up various terms and techniques online (for example, I had to look up "basting" and "straight grain"). Pay extra-close attention to any instructions telling you which side of the fabric to pin or trace the pattern onto, which pieces must abut a fold, and which pieces you will be cutting two of at once (by doubling up the fabric).

2. Prep and cut your pattern. This is fairly self-explanatory. Your instructions may vary, but generally you simply cut along the solid outer lines of your paper pattern, until all of the pieces are neatly trimmed into the shapes the fabric will ultimately be. My pattern probably hasn't been taken out of its envelope in sixty years, so I found it necessary to spread it under a handkerchief and iron it smooth (no steam, obviously), as its creases were quite tenacious. That plus cutting took me a careful hour.

My dress pattern, fully cut.

3. Pin the pattern to the fabric. Again, this is if you choose to pin your pattern, versus using tracing carbon to transfer the lines. Iron your fabric, if it's wrinkled. If you have the exact amount of fabric needed, according to the pattern's package, lay the pieces out precisely as instructed, to make sure you don't short-change yourself. Not trusting my own patience or experience, I bought an extra yard, so I didn't have to lay things out quite so precisely.

Be sure to do this step in strict accordance with your pattern's instructions, as well as the instructions printed on the individual pieces of the pattern. You'll need to pay close attention to folds, as some pieces of the pattern may be one half of a mirror image, doubled by butting them along the fold of a doubled-up length of fabric (like cutting out a Valentine heart from a folded piece of paper). Read the instructions carefully, as some pieces of the pattern will need to be pinned to the front the fabric, others to the back.

Once you're confident of the placement of the pattern pieces on the uncut fabric, pin the pattern in place using straight pins (I placed one pin about every inch or inch and a half, set a half-inch inside the pattern's edges).

Pin the pattern carefully to the fabric, to make cutting the fabric accurate and easy.

4. Cut the fabric. Cut out the various shapes roughly, so they're separate and easier to handle, as opposed to wrestling with long swathes of pin-covered fabric and delicate pattern paper. Using sharp fabric scissors (actually, I used hair-cutting scissors) cut the fabric right along the border of the pinned patterns. Also cut any "clip" lines, which will be labeled on the pattern.

My big old pile of pinned and cut pattern pieces and fabric, ready to baste!

That's it for the prep stage! Sounds easy, but go slow and read all the instructions twice before you cut anything. All together, cutting the pattern and fabric took me about four hours, including ironing and snack breaks and running up- and downstairs doing the laundry, pre-hurricane.

Back soon with the next stages—marking and basting!

Make Yourself a Dress, Part 1

It's been a few years since I've really sewn, aside from the odd hem. But back in college I probably made a half dozen skirts, a few tote bags, several blankets, two amateur but respectable quilts, and a zillion random little gifty things. But never before have I sewn from a pattern. The urge came because I have (or rather my trampy conjoined erotica-writing twin, Cara, has) a conference coming up in a few weeks, and we're in the market for a new dress.

Front of my 1951 vintage Simplicity dress 
pattern. I'll be making the style on the left.
As a soft-around-the-edges Irish-style lass, I look best in structured, non-clingy silhouettes. Jersey is not my friend, and neither is anything that won't hide bra straps. For my first Harlequin party last summer I stumbled across The Perfect Dress for myself at Macy's, a total retro fifties housewife number, with cap sleeves, a fitted waist, modest neckline, and a knee-length party-type skirt. Sadly, and despite the whole Mad Men craze, I haven't had especially good luck finding many more such dresses, off the rack. But as I was scouring Etsy, ogling vintage remakes but lamenting their prices (which are fair for handmade clothes but still way out of my budget) I thought, "Hey, make your own dress, stupid!" So I added the word "pattern" to my search for "1950s party dress", and so the project began.

Over the next few days, you're welcome to watch my progress. I could easily fail, since as I said, I've never worked from a pattern before. My sewing machine is basic but reliable, and despite living with a fashion major whilst in art college, my limited command of sewing vocabulary requires frequent consultations of the internet for definitions, diagrams, and how-to videos. But I have faith! So, let's get started.

Make Yourself a Dress, Part 1: Get Your Shit Together

This is the crucial, duh step my younger, more now-now-now! self would have fudged, but thankfully I've matured enough (and have been taught about the virtues of patience in abundance by the publishing industry) to realize that before you begin every project, you need to gather your materials.

1. The pattern. Most important by far (well, that and a sewing machine). As I said, I ordered my pattern from Etsy, from a site with quite a selection of vintage patterns. I actually bought two party dress patterns: a 1956 Butterick, and 1951 Simplicity. The one I'll be making this weekend (barring a hurricane-related power failure) is the Simplicity. (If you order vintage or pre-owned, make sure the seller specifies that the pattern is still "uncut".) While browsing, I had the additional step of figuring out what size I would have been, sixty years ago. The Gap thinks I'm a 6 and H&M thinks I'm an 8, but Simplicity says I land right between a 16 and an 18 in early 1950s sizing, going by my bust-, waist-, and hip-measurements. I went with the pattern for the 18, since it's far easier to take a dress in than to add to one.

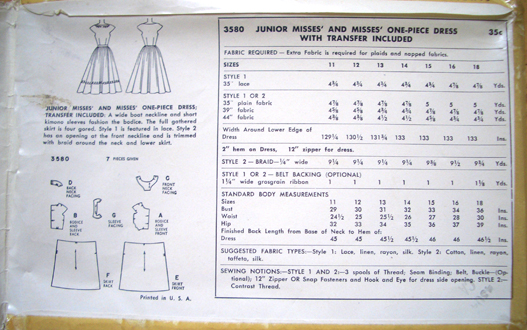
The back of my Simplicity pattern's packaging, with helpful sizing and materials info.

My dorky owl fabric, ordered from the highly
searchable and addictive Fabric.com.
2. Materials. The sizing information is displayed on the back of the pattern's packaging, along with tons of other valuable stuff, such as how much fabric to buy (depending on the size) and of what material, and all the notions you'll need (closures, trim, thread, etc.) I knew I wanted a kitschy pattern, but since I'm an amateur, I took the advice of the masses and chose a non-directional one, meaning unlike stripes or plaid, it won't matter if the pattern doesn't match up perfectly at the seams. Here's my shopping list (specific to my pattern and size, but it'll give you a sense of the checklist):
  • 5 yards cotton, linen, rayon, or other non-stretch fabric (I ordered 5½, to be safe)
  • 2½ yards chiffon, satin, or tulle (amount suggested by the helpful lady at Joann) to fill out the skirt; not included in the pattern, but I wanted this lining for both volume and aesthetic
  • 12-inch invisible zipper, color to match the dress
  • 2 yards wide satin ribbon, for belt / bow at waist, in contrast color to main dress
  • 3 spools thread, color to match the dress
  • seam binding (I actually skipped this, on the advice of the sharp little old lady stationed in Joann's pattern department, who said it's more trouble than it's worth)

3a. Tools. Most of these I already owned, but here's a basic list, all available at a fabric store like Joann:
  • Sewing machine, with various basic accessories
  • Hand-sewing needles
  • Many, many straight pins and a handy cushion in which to stick them
  • Tape measure (best to have this before you settle on a size)
  • Fabric scissors (or just sharp, clean everyday scissors)
  • Water-washable white pencil (for marking dark fabrics)
  • Seam ripper (dear God, do not forget this one)
  • Ironing board and iron

3b. Pattern tracing tools. For tracing your pattern onto your fabric, for accuracy. I'm actually doing this step the old fashioned way, cutting slits in the pattern for marking the fabric (I'm using a dark, chocolate brown fabric, so tracing carbon wouldn't help me much, hence the white pencil). But here's the shopping list, just to be helpful:
  • Pattern tracing paper (this is for if you want to make a copy of pattern, to preserve the original)
  • Tracing carbon (sometimes included with the pattern, also easy to find at Staples)
  • Plastic, non-serrated tracing wheel

4. Other essentials. Some equally important steps and materials:
  • Coffee or similar stimulant
  • A well-lit room with plenty of space to spread things out on the table or the [recently swept] floor
  • Comfy clothes, as you'll likely be kneeling and bending and leaning over a lot
  • A good mood; don't attempt this when feeling impatient or irritable
  • Hours of calming-but-upbeat tunes (I used to sew and knit exclusively to Tori Amos and Nine Inch Nails, but luckily I've since graduated to Martin Sexton, Neko Case, Joni Mitchell, and the Mystery Jets)

All my materials, ready to go!

So that's Part 1. In the next step, I'll tell you how to prepare the pattern and the fabric, before we actually begin the hardcore sewing of the damn dress.

Thursday, August 25, 2011

Thrusty Thursday: Tahmoh Penikett

Hey, the blog and I are back from hiatus! In honor of my delightful recent trip to Canada, I say we thrust against someone from the great white North. So vast a population of Canadian foxes to poach from… But let's go with actor Tahmoh Penikett, who hails not merely from Canada, but from the fricking YUKON. My loins, how they tremble!

My husband was very nice about my not-especially-subtle crush on Penikett when we watched the Battlestar Galactica relaunch a year or two ago… Then again, Helo's hotness kept me actually paying attention through an entire science fiction series—no small feat—so perhaps my tactless ogling was just the price my man was willing to pay to watch something he enjoyed. And I enjoyed the show greatly as well, beyond the mere splendor of Helo's foxtastical arms in that excellent double-tank-top ensemble. (Penikett's also in Dollhouse and quite a few other shows and films, but I much preferred him sweaty and sleeveless, handsome though his face is.)

I tried and tried to find an embeddable video of that scene where Helo and Boomer get it ON in the rain on Caprica because that shit was SEXY. But the folks who own the show must have seriously studious copyright police, as nary a clip I found. Dag.

So onward to the mantage!


Oh right, and…


Wednesday, August 17, 2011

Hell froze over!

Greetings from Victoria, BC! Vacation is still in full effect, but I'm popping in to interrupt the blog hiatus with some long-awaited great news—I finally sold a second book to Harlequin Blaze! I found out this afternoon while driving around Vancouver Island, and though my phone cut out on my editor, I heard enough to the know it was the news I'd been giving myself gray hairs over.

It's been an entire year since the first sale, and while I'd heard from multiple series romance authors that the second sale is infamously the hardest (since the first is often a bit of a fluke), I won't pretend I wasn't starting to doubt my ability to ever come up with another winning proposal.

If you're curious about the details, the book's working title has been Honeymoon for One, and it's about an actress who pulls a runaway-bride act on her wedding day and meets an unscrupulous (but alluring) pilot when she runs off to enjoy her Caribbean honeymoon, sans two-timing groom. I'll be sure to include a few lines in a Six Sunday post when I'm back in Boston next week.

Thanks to everyone who told me to hang in there through the failed proposals and jags of self-doubt, and the looong spells of cricket-chirping these past twelve-plus months. Couldn't do this job without you guys!

Monday, August 1, 2011

Hiatus!


The Super Lucky #1 Fun Blog is going on a quasi hiatus for the next couple weeks, so posts will be few and far between. While you're waiting for me to return and spew forth fresh nonsense, check out these classic all-time-most-popular posts, from the vault! A very shallow vault, since this blog's only a year old.

Enjoy!